With so many technical terms and processes to work your way through, this print glossary aims to provide you with all the information you will need to successfully gain an accurate quotation and achieve the outstanding quality print work you are looking for.
Check back each week for a new term and grow your knowledge of the print sector.
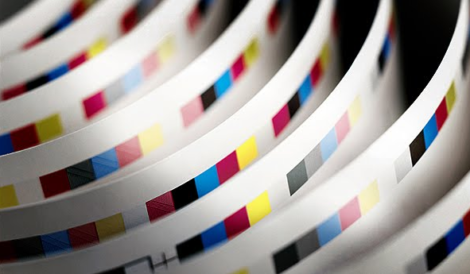
Colour Bars
Colour bars are produced to aid quality control. They are squares of colour and greyscale printed in the trim area which are test targets that are used to measure print.
The printing press operator will use these coloured squares to check that colour density and consistency is maintained throughout the run of a particular job.
Here at Emmerson’s this checking process is automated using a digital scanner which tracks the colour bar to ensure the quality and consistency.
Printing colour bars
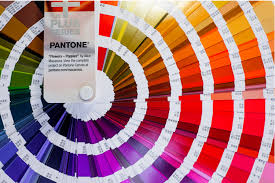
Pantone
Pantone is a standardised colour matching system, utilising the Pantone numbering system for identifying colours.
By standardising colours, different manufacturers (such as printers) can all reference a Pantone numbered colour, ensuring the colours match.
Pantone colours are generally described by their allocated number, such as “PMS 300”. PMS colours are almost always used in brand guidelines and ensure consistency throughout materials produced.
A large proportion of the world’s printed material is produced using the CMYK process, and there is a special subset of Pantone colours for this. However, most of the Pantone system’s 1,114 spot colors cannot be simulated with CMYK but with 13 base pigments (14 including black) mixed in specified amounts. The Pantone system also allows for many special colours to be produced, such as metallic and fluorescents.
Pantone Colour Chart
CMYK
CMYK stands for four ink colors – Cyan, Magenta, Yellow and Key (Black).
The “K” in CMYK stands for Key, this is because in four colour printing, cyan, magenta and yellow printing plates are carefully keyed, or aligned, with the black key plate. This key plate is the plate which prints the detail in an image.
In Offset printing, the four CMYK ink colors are applied to the paper in successive layers. By overlapping these four ink colors in various concentrations, a huge number of other colors can be created. As a result, the combined visual effects of these four CMYK colors produce what we commonly know as Full Colour Printing.
CMYK Printing Plates
Die-Cutting
Die-Cutting refers to the act of using a sharp die to cut paper or card into various shapes.
Just like the printing process, die-cutting is an automated operation. This allows multiple pieces of the same shape to be created in an efficient and uniform manner. Dies can be created for any special designs.
Die-cutting is as versatile as your imagination. A die can be used to shape the entire perimeter of a printed piece, or it can be used to just shape one corner or an edge. A die can also cut out a shape or shapes from within the center of a piece.
Die Cut Mask
Spot UV
Spot UV varnish (ultra violet) is a special print finishing technique that allows a gloss varnish to be applied to specific areas of a printed piece giving a shiny effect.
You can use spot UV varnish to enhance a photograph or make text leap off the page. To maximise the contrast, you can apply a matt laminate to your printed item before adding the spot UV varnish.
Spot uv Varnish
Embossing and Debossing
Embossing and debossing are the processes of creating either raised or recessed relief images and designs in paper and board.
An embossed pattern is raised against the background, while a debossed pattern is sunken (indented) into the surface of the material (these processes may protrude somewhat on the reverse).
Blind embossing does not include the use of ink or foil to highlight the embossed area.
Registered embossing is a process that places the embossed image in alignment with another element created with ink or foil.

Registered Debossing
Foil Blocking
Foil blocking (also referred to as foil stamping) is the process of applying metallic or pigment foil to paper or card. A heated die (which is an engraved metal piece) is stamped onto the foil, making it adhere to the surface and leaves the design of the die on the paper.
Foil blocking creates a special end result (finish) to a printed piece of material, on either fine or larger areas. Using classic colours such as gold or silver or bright metallic colours which are also available, are often used to highlight an area of design such as a logo.
Foil blocking is also used effectively without print and can create elegant typography or vector shape designs.
Foil Blocking
Encapsulation
Encapsulation is the process of covering and sealing the surface of printed paper or board with a tough waterproof, plastic film which comes in a range of thickness (called micron).
The encapsulation extends beyond the print sealing it completely making it waterproof. The final print can then either be trimmed flush (so there is no boarder) or left with a clear boarder. An encapsulated piece of print cannot be folded.
Encapsulation is more robust than lamination and helps to strengthen the printed item, improving its durability.
Common uses for encapsulated print include maps, stand-up table menus and ID badges to name but a few.
Lamination
Lamination is the process of applying a thin layer of plastic (film), to paper or card to enhance and protect it. By doing so, it protects the material extending it’s life span and adds strength and rigidity.
Lamination is often used for book/brochure covers, folders and business cards and usually accents the existing colour. Common types of lamination are gloss, matt, soft touch and anti-scuff.
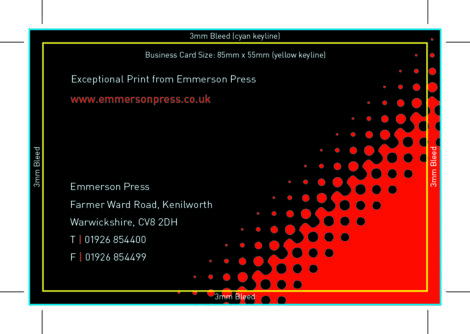
Bleed
Bleed is printing that goes beyond the edge of where the sheet will be trimmed. In other words, the bleed is the area to be trimmed off. Artwork and background colors can extend into the bleed area. After trimming, the bleed ensures that no unprinted edges occur in the final trimmed document.
The industry standard in the UK is generally to apply 3mm bleed area, here at Emmerson Press our Pre-press team thoroughly review your artwork and print specification to ensure enough bleed has been applied. Not applying enough bleed can result in a finished product showing a thin area of white on the edge
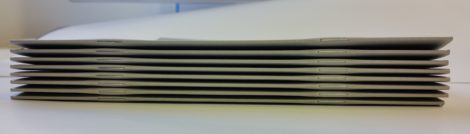
Creep
Creep is a term used when producing a book, booklet or brochure, which is saddle stitched. It refers to the middle pages of a folded product extending slightly beyond outer pages. It is simply the distance pages move away from the spine to accommodate paper thickness and folding.
When producing print work such as this, the “cover” is the outermost printed spread, while the “centerfold” is considered to be the innermost printed spread. In order to ensure that the pages will sit correctly in the finished product, a creep value is applied, taking into account the number of page spreads and the thickness of the paper being used.
Saddle Stitch
Saddle Stitching is a popular book binding method in which folded sheets are gathered together one inside the other and then stapled through the fold line with wire staples. The staples pass through the folded crease from the outside and are clinched between the centermost pages.
The collated sheets are draped over a Saddle-like apparatus during this process, hence the name Saddle Stitch.
Saddle stitching is the cost effective and commonly used method of binding for leaflets, booklets etc. Two staples are commonly used.
Saddle Stitched Books
PUR Binding
PUR Binding is where pages and a soft cover are glued together at the spine. The remaining three sides are trimmed to give them clean “perfect” edges.
This method makes use of Polyurethane Reactive (PUR) adhesive. PUR binding is recommended (over perfect binding) for larger paginations, heavier weight paper or for documents which will be well used.
Polyurethane Reactive (PUR) is the most durable book binding glue, between 40-60% stronger/better resistant than a glue used in traditional Perfect Binding. However, it still remains flexible when the book/brochure is open wide or pressed down late, preventing the spine from cracking.
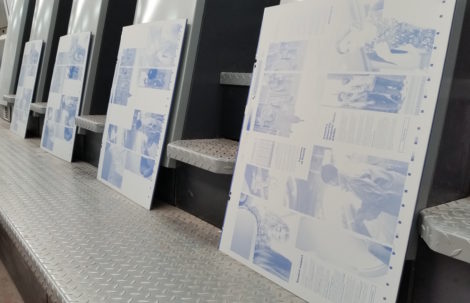
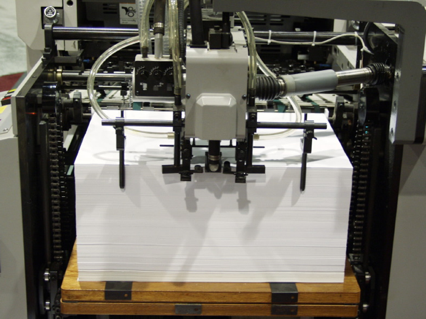
Makeready
Makeready is a term primarily used when referring to lithographical (offset) printing.
This term refers to all the activities required to prepare a printing press for a job – the setting up and adjusting of inks, paper and specifications prior to printing. It can also be referred to as “set up”.
Basically, these are the test sheets run to ensure everything is set up correctly for the job to run through the press and produce exactly what is expected.
Here at Emmerson Press our Heidelberg XL75 is equipped with Axis Control which enables us to Make Ready very quickly with minimal waste, reducing our environmental impact.
Throughout the print process the press operator makes constant adjustments to ensure the final printed product is consistent and up to the expected standard, this can include alterations such as adjusting ink to ensure the paper coverage is accurate.
Sheet-fed
The term ‘Sheet-fed’ is often used when referring to offset-printing.
It is the method in which individual sheets of paper are fed into a printing press. A suction bar is used which lifts and drops each individual sheet of paper into place.
Sheet-fed litho/off-set printing is commonly used for producing magazines, brochures and leaflets. It allows the paper to feed into the press with absolute precision and accuracy.
The majority of digital printers/presses are not sheet-fed. However, the Fujifilm Jet Press 720s offers sheet-fed precision, alongside outstanding print quality on a short print runs. Emmerson Press owns the first Jet Press in the UK, installed in April 2016.
Example of Sheet-fed
Blanket
A blanket, when referred to in the printing sense, is associated with Offset Printing.
Offset printing is a commonly used printing technique in which the inked/printed image is transferred (or “offset”) from a plate, to a blanket, then to the paper.
The blanket is a rubber-coated pad or mat and is mounted on the cylinder of an off-set press (Emmerson Press have Heidelberg Printing Presses). This blanket receives the inked image from the printing plate and then transfers it to the surface of the paper.
The blanket for offset printing is very important part of process. The surface structure, profile, and hardness contribute significantly to the printing performance and has a direct effect on the quality of printed image. The blanket must also be able to function at high speeds with different paper stocks.
Crossover
Crossover is an image that is printed on one page and continues from that page of a brochure/ magazine across the gutter to the opposite/facing page.
This can also be called bridge, gutter bleed and gutter jump.
Due to the way in which printing a bound brochure/magazine occurs, where possible it is advised that this is avoided. As you can see from the image below, pages 2 and 3 are not printed next to each other, so getting them to align perfectly when trimmed and folded is very difficult.
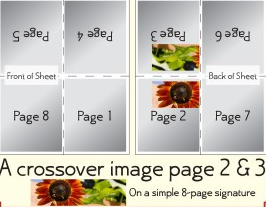
Example of Crossover
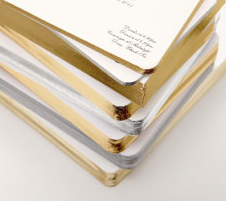
Gilt Edging
When looking for a technique to make your materials stand out, gilt edging is often chosen.
This is a technique where a foil or colour is applied to the edges of materials, such as business cards, invitations, letterheads or books.
Often a ‘gilt-edged’ piece of material is viewed with prestige and gives the impression of quality. Rather than the just the traditional gold or silver foil, specialist suppliers offer a whole spectrum of colours and finishes such as florescent, metallic, satin, gloss or matt.
Example of using gilt edging
GSM
GSM stands for Grams per Square Metre.
GSM is a popular technical term in relation to paper. It relates to the weight of the paper, rather than the thickness.
If you weighed a sheet of paper that is 1 metre x 1 metre in size, the weight of that sheet in grams is the GSM value of that particular paper stock.
80-120gsm
This is the typical range used in your printer or photocopier at work/home, ideal for business stationery.
120 – 170gsm
This is a slightly thicker range, generally used for posters and flyers.
Up to 300gsm
This weight range offers a thicker, steadier finish, often viewed as more premium. it is often chosen where quality is of importance.
300 – 450gsm
This weight is more of a board/card. 350 and 400gsm are very common for Business Cards.
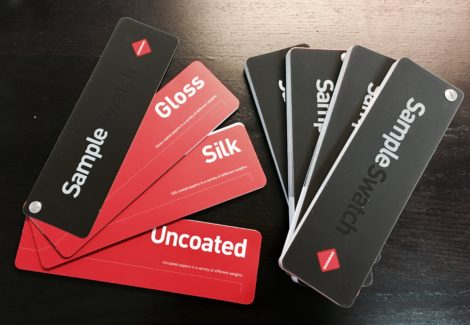
If you would like a paper sample Swatch, please email enquiries@emmersonpress.co.uk
Laser cutting
Laser cutting and die cutting are two of the many special finishes which can be applied to printed materials to make them appealing to audiences and stand out against competitors. But what is the difference between the two?
Essentially, both cutting processes cut paper/card into a specific design or shape.
Laser cutting uses LASER technology to cut materials, by directing the output of a high-power laser, at the material that is to be cut, in our case, paper/card.
Die cutting uses ‘a die’, which is often wooden, with sharp steel rules positioned in the shape of the desired design/pattern, which then cuts into the paper to create the cut out design required.
Laser cutting tends to be used for more intricate detailed shapes that require a perfect cut. The process allows even tiny areas to be cut out with precision.
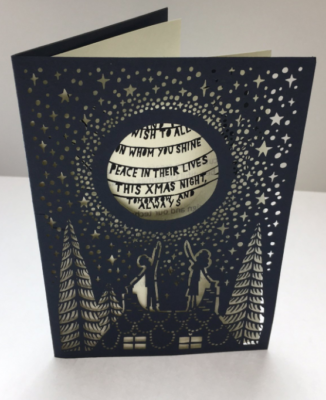
Beautiful example of the intricate designs that can be achieved through laser cutting
Most papers and cards can be either die cut or laser cut. Of course, the effect will differ according to the stock used.
In-line
In-line is a description of a series of processes connected together in a logical sequence, requiring little user interaction.
When referring to in-line from a printing perspective, in-line presses have a variety of finishing devices attached to them, in the proper/logical sequence after the printing unit itself. These finishing devices could be folders or, die cutters for example.
This therefore allows a printed piece of material to pass directly through all the printing and finishing stages without having to be taken off press and placed onto another set of devices.
Imposition
Imposition is one of the fundamental steps during the pre-press process.
It Is essentially the arrangement of the pages on a single flat sheet of paper (which could be B2, SRA2 etc.) so that once the printing has been completed, and can then be collated, folded, bound and trimmed and the pages will end up in the correct order.
Correct imposition minimises printing time by maximising the number of pages per sheet through the press, reducing the cost of the press time and materials. To achieve this, the flat printed sheet must be filled as fully as possible.
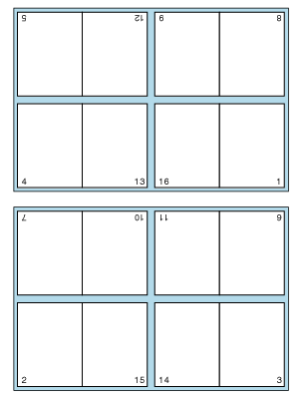
Example of imposition
Case binding
This is a binding method, whereby the grouped printed pages (signatures) are firstly sewn together with thread, before being encased between cardboard covers, which are often covered in cloth, plastic or leather.
It is essentially the traditional process of making hard cover books and can often be referred to as cloth bind, edition bind, hard bind and hard cover.
Casing-in, is the process of attaching the hard cover case to the book block of signatures. A Dust Jacket can also be added, which is a separate paper “cover” for a hard cover book, which wraps around the case wrap but is not permanently attached.
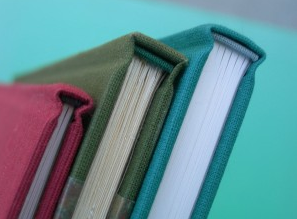
Example of the case binding method
Hot Dots
Hot dots can also be referred to as ‘sticky dots’ or ‘glue dots’ and these fit into the ‘finishing’ aspect of printing.
These dots are either made up of removable or permeant adhesive. They are very cost effective and can be included in the hand-finishing section of a quotation.
These dots can be used in many different ways, including;
- Sealing catalogues or brochures
- Sealing a promotional letter which needs to be held closed for mailing
- Attaching business cards to other marketing materials
- Attaching CD’s to brochures
- Attaching promotional items, such as chocolates to a brochure or magazine
Trapping
Trapping was a term originally used as a measure of how well one ink printed on top of another.
Since the introduction of pre-press Software, the term is often used to describe the overlapping of one colour over a different, adjacent colour, to ensure that no white space is visible where the two colours meet.
These white gaps/spaces can occur due to mis-registration, so trapping is used to creating overlaps (spreads) or underlaps (chokes) during the print production process, to eliminate this on the press.
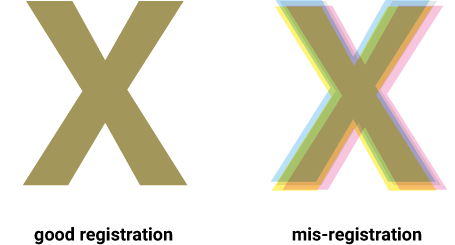
Registration
When used in reference to colour printing, registration is the method of correlating overlapping colours on a single image.
When printing an image which is more than one colour, each colour is printed separately whilst going through the press (CMYK). To ensure a crisp, quality finish, it’s vital that each colour overlaps precisely. If this doesn’t happen, the image will look fuzzy/blurred or ‘out of register’.
Registration is the system used which helps to line the colours up correctly and ensure that each is printed as required. Mis-registration can occur due to the initial settings of the press or by changes to or movement of, the paper being printed on.
Author’s Corrections
Author’s corrections (or often referred to as Author’s Alterations or Amends) are changes made to artwork during the proofing stage, prior to printing.
These changes are requested by the customer and it is the original artwork file supplied, which is then altered. These changes are made by a member of staff from the printing company, usually someone from the pre-press team.
The cost of making such alterations is often charged for by the printer, in addition to the printing cost itself. Here at Emmerson Press, we do not charge for making author’s corrections. We will often provide a new hard copy proof as well if this is required by our customer.
Section Sewn
Typically, a hard bound book will be section sewn. This is a traditional method of fixing pages together that involves them being sewn rather than glued.
When a book is section sewn, the pages are folded and collated into sections, each section is then sewn together.
When books are perfect bound and glue is used, alternating weather conditions which the books is exposed to (hot or cold) can cause the glue to harden. Since the threads are flexible and aren’t affected by weather, section sewn books are much more durable. They considered to be the strongest and best quality binding solution, which adds longevity to a book.
The finished product also opens out flat with no risk of any sheets falling out. This is particularly ideal for full colour spreads for luxury brands.
Thermography
Thermography or thermographic printing is a printing process that causes text or graphics to be slightly raised from the paper stock, through the use of heat.
This visual effect is a technique that is commonly used on invitations, letterheads, business cards, greetings cards and certificates. As it is a tactile effect, thermography can be used to print braille text.
Thermography combines a traditional printing method with a specific type of finishing. The process can be fairly manual or produced using a completely automated system, depending on the supplier.
Press sheets are first printed using a regular offset (Litho) press, but using a special type of ink that does not immediately dry.
The printed sheets are then dipped into a powdered polymer or resin. This polymer sticks to the wet ink. The excess powder is removed, either manually by holding them up and tapping the back or automated, by having a machine dust the sheets with the colourless resinous powder.
The sheets are then fed into a small oven (with temperatures ranging from 900 to 1300 degrees Fahrenheit) that melts the polymer and fuses it to the ink. This takes just a few seconds. A cheaper, but more manual option is to use a heat gun that blows hot air to achieve the same effect. The powder that is used is available in a clear matt or high gloss finish, which allows the ink colour to show through.

Self-cover
The term ‘self-cover’ is normally used when referring to the printing of magazine, booklets and brochures. In its simplest terms, it means when printing, the exact same paper stock (type and weight) is used for the entire document.
The term ‘separate-cover’ means that you are printing the outer cover of the document on a different weight or type of paper stock than the inner pages. Often the cover is heavier in weight and with an added finishing process such as a lamination.
Printing with a self-cover is the cheapest of the two options, as the cover can be run on the press at the same time as the inner pages. If the document has a separate cover on a different weight or type of stock, then the document has to be printed in 2 passes through the printer.
RIP
RIP is an abbreviation for ‘raster image processing’, This is technically a piece of firmware and/or software that produces an image suitable for printing.
The process turns any file (such as a PDF) into a high-resolution single file that is readable by printing equipment. It creates what is referred to as a bitmap or raster image and the file’s contents are mapped to the bits or pixels on the screen. The pixels we see on screen are then translated to the pattern of ink dots we will see on paper.
Colour Gamut
Colour gamut refers to the range of colours a particular device can reproduce. For the purposes of this article, we are referring to printing.
The larger or wider the gamut, the more rich, saturated colours are available when printing.
If a colour gamut becomes smaller, it is generally the rich, saturated colours that are the first to suffer, a phenomenon referred to as clipping.
This clipping is most apparent when converting from RGB (colours used when designing using a computer) to CMYK (4-colour printing process), with many of the rich saturated colours that were available in RGB no longer being available in CMYK.
Our new B2 digital press produces materials using the Fujifilm Max Gamut. Many of our customers are setting themselves apart from their competitors, by making maximum use of the wide colour gamut inks used within the Jet Press 720s, providing them with materials of outstanding colour and vibrancy as well as fine line detail.
Our Jet Press is one of only two in the UK. To find out more about the Jet Press, view our video.
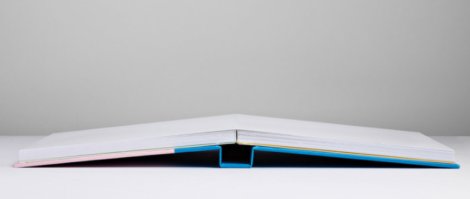
Lay Flat Binding
This method of binding allows a brochure/publication to lie fully open. It is often chosen for a brochure or book which has many high-quality images which are going to spread across a double page. As there is a 0% gutter, it means the image is completely uninterrupted across the spine.
In a perfect bound brochure, the text pages are attached to the cover at the corners of the spine, which results in the following finish;

When using lay flat binding, the inner text page blocks are not actually glued to the spine of the cover pages. As you open the brochure, the spine of the cover, moves away from the text pages, allowing the book to lie completely flat as shown below.
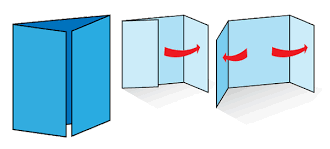
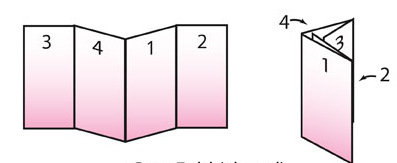
Gatefold
A gatefold refers to a method of folding a flyer/leaflet. It is one of the three most commonly used methods of folding. The other two ways are a roll-fold and a Z-fold, which is often referred to as a concertina or accordion fpress.
A gatefold is essentially where the two outside panels fold inwards to meet in the middle, and it can consist of a 3 or a 4 panel fpress.
The blue diagram below showcases an open gatefold, in which there are 3 panels. The bottom panel is roughly double the size of the folded panels.
A closed gatefold has 4 panels and each panel is roughly equal in size. The outer panels are folded inward together as shown in the pink diagram below.
 Open Gate Fold
 Closed Gate Fold
Gloss, Silk and Uncoated Paper Stocks
Gloss paper stock is a coated paper which has a shiny finish. It is often used for leaflets and other give-away literature. The glossy surface does result in it being quite difficult to write on, so this is worth considering when choosing a stock to use.
Silk paper stock is also a coated paper, which has a subtle sheen to it. This tends to be the most popular paper stock for brochures, posters and leaflets. The coating for gloss and silk stock is normally made from clay.
Uncoated paper stock, is exactly as it is named, not coated. It can also be referred to as offset paper. It is slightly rougher to touch due to touching the paper fibres rather than a coating. This type of stock is ideal for writing on, so it if often used for nice quality business stationery, although many companies like to use this stock for their brochures and other marketing materials also.
DPI
When artwork is being created, often the designer will request that all images/photographs are supplied at 300dpi to ensure the quality of the print – but what does this mean?
DPI stands for “Dots Per inch” and refers to the level of detail. Quite simply, a dot is the most basic/smallest element of an image when referring to print.
The more dots per inch, the better the resolution (and therefore detail), resulting in shaper images when printed.
Printing Plate
One of the most common ways to print uses “printing plates” to transfer an image to paper or other materials. This is known as offset or lithographic printing.
Plates are usually made of a thin sheet of metal. Metal plates are more expensive than alternatives, such as plastic, paper or rubber plates, but they do last longer, produce high-quality images and have greater accuracy. The plates are thin, flexible, and are usually larger than the paper size being printed on.
The imagery is put on the printing plate using a photochemical process, during a production stage called prepress. One plate is produced for each colour ink to be printed. The plates are then attached to the plate cylinders on the litho printing press.
Offset Printing
Offset printing is a common printing technique where an inked image is transferred (or “offset”) from a plate to a rubber blanket, then onto the paper.
Offset printing is an indirect print process, the ink is not applied directly from the printing plate to paper, but rather indirectly via a roller.
Offset printing is a lithographic process. Lithography is based on the repulsion of oil and water. The image areas attract ink and those non-image areas may be coated with water or may have a surface such as silicon, which then repels the ink and therefore keeping it clear.
Development of the offset press came in two versions: in 1875 by Robert Barclay for printing on tin, and in 1904 by Ira Washington Rubel for printing on paper.
A few of its common applications include newspapers, magazines, brochures, and books.
Here at Emerson Press, we have 3 Heidelberg Presses, including the Speedmaster XL 75. Watch the Heidelberg Speedmaster XL 75 in action here.
For help with printing lingo, to obtain a quote, request samples or visit our Heidelberg Press Room, contact us in one of the following ways;
E: enquiries@emmersonpress.co.uk
T: 01926 515 091
Facebook: @emmersonpress
Twitter: @emmerson_press
Linkedin: www.linkedin.com/company/emmersons